Compass Map Laser Cutting Wood Project: A Creative Way to Display the World
In an age where personalization and craftsmanship are highly valued, laser-cut map projects have emerged as a unique way to combine art with geography. One such innovative creation is the Compass Map Laser Cutting Wood Project, which blends the functionality of a compass with the beauty of a world map. This design is not only visually appealing but also serves as a conversation starter for home or office interiors. Whether you're a DIY enthusiast, an interior designer, or someone passionate about global culture, this project offers endless possibilities for creativity and customization.
What Is a Compass Map Laser Cut?
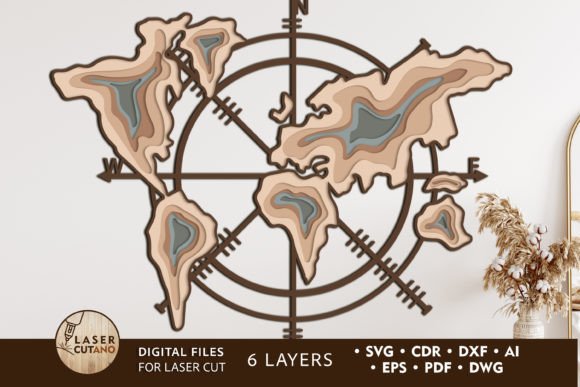
A compass map laser cut is a layered wall art piece that features a detailed world map surrounded by the elements of a compass rose. The design is crafted using digital multilayer layout files specifically optimized for laser cutting machines. These files allow users to create intricate, professional-looking maps from various materials like wood, acrylic, or metal. The compass element adds directionality and symbolism, making it a perfect representation of exploration and navigation in both physical and metaphorical senses.
How It Works
The process begins with downloading a digital file set, often available in formats like .AI, .SVG, .DXF, .DWG, .CDR, .EPS, and .PDF. These files contain all the necessary layers and paths required to produce the final product on a laser cutter or CNC router. Once the design is ready, each layer is cut separately and then assembled by gluing them together. The recommended material thickness for wood is typically between 3-6 mm (1/8in - 1/4in), ensuring structural integrity while allowing for fine detail work.
- Laser Cutting: Uses precise laser beams to cut out each shape based on the digital design.
- CNC Routing: Employs computer-controlled routers for similar results, especially useful for thicker or denser materials.
- Layering: Each part of the map and compass is printed in different layers, adding depth and dimension to the finished product.
Why Choose a Multilayer Design?
Multilayer designs bring a new level of sophistication to laser-cut wall art. Unlike flat, single-layer prints, these three-dimensional pieces offer a tactile experience and a more realistic representation of geographic features. The Compass Map Digital Multilayer Layout Files are specially prepared to ensure compatibility with cutting machines, making it easier than ever to achieve clean lines and accurate shapes.
With six distinct layers, the finished product measures approximately 32 x 27 inches. This size provides enough detail to showcase continents, oceans, and the compass rose without overwhelming the space. Each layer can be painted before assembly, giving you the freedom to choose colors that match your decor or reflect your personality.
Benefits of a Multilayer Compass Map
- Depth and Realism: Layered components give the illusion of topography and elevation, enhancing visual appeal.
- Customization Options: You can paint, stain, or engrave each layer individually to suit your style.
- Durability: Using materials like plywood or MDF ensures longevity and stability once assembled.
- Easy Assembly: Instructions are usually included, making it simple even for beginners to build their own map.
Applications and Relevance in Modern Spaces
This type of laser cut world map has found its place in modern homes, offices, classrooms, and commercial spaces. Its blend of education and decoration makes it a versatile addition to any room. In an office setting, it can symbolize global reach and strategic thinking. In a classroom, it becomes a teaching tool that sparks curiosity about geography and cultures. At home, it's a stylish yet meaningful piece of wall art that reflects the owner’s interests and sense of adventure.
Businesses in the travel, education, or design industries often use these maps to convey themes of exploration, knowledge, and innovation. For example, a travel agency might display a compass map to emphasize the variety of destinations they offer, while a university could use one to highlight international partnerships and student exchanges.
Examples of Use
- Home Decor: Hang it in a living room or study to add a touch of elegance and intellectual flair.
- Corporate Offices: Use it in meeting rooms or lobbies to represent global operations and customer reach.
- Gifts and Keepsakes: Custom-painted versions make excellent gifts for graduates, travelers, or globetrotters.
- Classroom Teaching Aid: Teachers can use it to engage students in geography lessons with a hands-on activity.
Materials and Tools for the Project
Creating a Compass Map Laser Cut File SVG requires specific materials and tools. While the digital design handles the precision of the cuts, the right materials ensure the best outcome. Here’s a breakdown of what you’ll need:
Recommended Materials
- Plywood: Affordable, easy to cut, and suitable for painting or staining.
- MDF: Smooth surface ideal for detailed laser work and finishing.
- Acrylic/Plexiglas: Offers a glossy, modern look and is great for illuminated displays.
- Metal: Provides a sleek, industrial aesthetic; however, it may require specialized settings on the laser cutter.
- Cardboard or Paper: Excellent for quick prototypes or budget-friendly test runs.
Necessary Tools
- Laser Cutter or CNC Router: Essential for accurately cutting the intricate layers.
- Glue and Clamps: Needed to assemble the layers securely after cutting.
- Paint and Brushes: Optional but highly recommended for adding color and personality.
- Protective Coating: To preserve the finish and prevent fading over time.
Design Considerations and Tips
Before starting your project, there are several factors to consider to ensure success. One important aspect is scaling the design. You can increase the size of the Compass Map Laser Cut File to fit larger walls, but reducing it may compromise the visibility of thin elements like coastlines or small countries. Always check the design specifications to maintain clarity and detail.
Another key tip is to prepare each layer before assembling. Painting the background and foreground elements separately allows for better contrast and visual impact. If you're using natural wood, consider staining lighter regions differently from darker ones to simulate landmasses and water bodies.
Common Misconceptions
Many people assume that laser-cutting is only for professionals. However, with user-friendly software and pre-made SVG files, hobbyists and beginners can easily complete complex projects at home. Additionally, some may think that multilayer designs are too difficult to assemble, but most kits come with clear instructions and templates to guide you through the process step by step.
Where to Find Quality Laser Cut Files
If you're interested in starting your own Compass Map CNC and Laser Cutter SVG project, finding reliable digital files is crucial. Websites like LaserCutano specialize in creating modern, high-quality laser-cut maps tailored for every space. Their Compass Map Digital Multilayer Layout Files are designed with attention to detail and ease of use in mind.
After purchasing, you'll receive a downloadable .zip file containing all the necessary digital assets. It's important to remember to unzip the folder before accessing the individual files. Each format (.AI, .SVG, .DXF, etc.) is compatible with different software and machines, so choose the one that works best for your setup.
Choosing the Right Format
- .SVG: Ideal for vector-based laser cutting due to its scalability and precision.
- .DXF: Commonly used for CNC routing and CAD software compatibility.
- .AI: Best if you plan to edit the design in Adobe Illustrator before cutting.
- .PDF: Useful for printing outlines or checking alignment before sending to the machine.
Bringing Your Vision to Life
Once you’ve selected your materials and downloaded the appropriate files, the real fun begins. Assembling the layers gives you control over the final look of your map. You can experiment with different color schemes, textures, and finishes to match your vision. Some artists prefer a minimalist black-and-white style, while others go bold with vibrant hues to highlight continents or ocean currents.
For those who enjoy a challenge, customizing the compass rose with symbols representing personal journeys or cultural significance can turn the project into something deeply meaningful. Imagine marking the places you've visited or dream of traveling to—this adds a unique, personal touch to your artwork.
Step-by-Step Overview
- Download and unzip the digital files.
- Select your preferred material and prepare it for cutting.
- Load the SVG or DXF file into your laser cutter/CNC machine.
- Cut each layer carefully, following the recommended settings for your material.
- Paint each layer before assembly to enhance visual appeal.
- Use glue and clamps to join the layers securely.
- Hang or display your finished Compass Map proudly!
Conclusion
The Compass Map Laser Cutting Wood Project is more than just a decorative item—it's a fusion of art, technology, and geography that speaks to our innate desire to explore and understand the world around us. With the availability of Compass Map Laser Cut File SVG and other compatible formats, anyone can bring this stunning design to life using a CNC router or laser cutter. Whether you're looking to decorate your space, teach geography, or simply express your love for travel, this project offers a rewarding and creative outlet.
By choosing a multilayer layout, you open up opportunities for customization and artistic expression that flat maps cannot provide. And with companies like LaserCutano offering professionally designed files, the barrier to entry is lower than ever. So why not take a journey through your own workshop? Create a world map that tells your story—one cut at a time.