Clock with 2 Pattern for Laser Cutting: A Guide to Creating Stunning, Customizable Timepieces
Creating a unique and artistic timepiece doesn't have to be complicated or expensive. With the right tools and resources, you can design and produce a beautiful clock with 2 pattern for laser cutting that stands out in any room or as a special gift. This guide will walk you through everything you need to know about using vector designs for laser cutting, from understanding the basics of the process to choosing the right materials and formats for your project.
What is a Clock with 2 Pattern for Laser Cutting?
A clock with 2 pattern for laser cutting refers to a decorative clock face composed of two distinct patterns or layers, which are cut from a flat material using a laser cutter. These patterns often include intricate designs, such as geometric shapes, floral motifs, or abstract art, arranged in a way that complements the functionality of the clock while adding visual appeal.
The beauty of this type of clock lies in its versatility. Whether you're an artisan looking to expand your product line or a hobbyist exploring new creative projects, these designs allow you to produce high-quality clocks without the need for advanced woodworking skills. The two-pattern layout adds depth and dimension, making each piece feel more dynamic and original.
Why Choose Laser-Cut Designs for Clocks?
- Precision: Laser cutting ensures clean, accurate cuts, even for complex patterns.
- Customization: You can easily modify colors, materials, and designs to suit your style or brand.
- Efficiency: Once you have the vector file, production becomes fast and repeatable.
- Universality: The same design can be adapted for various materials like plywood, cardboard, acrylic, or MDF.
- Professional Quality: The result looks polished and professional, perfect for selling or gifting.
Understanding Vector Files for Laser Cutting
To create a clock with 2 pattern for laser cutting, you’ll typically work with a vector file. These files are digital blueprints made up of points, lines, and curves that define the shape and structure of the design. Unlike raster images (like JPEG or PNG), vector files maintain their quality at any scale, making them ideal for precise manufacturing processes like laser cutting.
The term "vector template" refers to the downloadable design file used to produce the clock. It includes all the necessary details for cutting and engraving, ensuring the final product matches the intended look and function.
Supported File Formats for Laser Machines
Most laser cutting machines support multiple file types. For the best results, it’s essential to choose the format compatible with your equipment. Here are the most common ones included in typical laser cut pattern packages:
- SVG (Scalable Vector Graphics): Widely supported by many software programs and laser machines.
- PDF (Portable Document Format): Great for viewing and printing but not always suitable for direct cutting unless properly converted.
- CDR (CorelDRAW): Ideal for users who prefer to edit the design in CorelDRAW before sending it to the laser machine.
- AI (Adobe Illustrator): Suitable for designers who use Adobe Illustrator for detailed edits and customizations.
- EPS (Encapsulated PostScript): A standard vector format that works well with both design and laser-cutting software.
- DXF (Drawing Exchange Format): Commonly used in CAD software and compatible with most industrial laser cutters.
Each format has its strengths, so knowing what your machine requires is key to successful production. Always check compatibility before downloading or purchasing a vector drawing cut file.
Materials for Laser-Cut Clocks
One of the advantages of a universal product like a laser-cut clock is its adaptability to different materials. The most popular options include:
- Plywood: As shown in the photo, 3mm thick plywood is a favorite choice due to its durability and smooth finish after sanding.
- Cardboard: Perfect for quick prototypes or budget-friendly versions. It's easy to cut and paint.
- MDF (Medium-Density Fiberboard): Offers a consistent surface for engraving and painting, though it may require sealing.
- Acrylic: Provides a modern, transparent look and can be colored or layered for added effect.
- Wood Veneer: Adds a natural aesthetic and can be combined with other materials for mixed-media designs.
No matter which material you choose, the laser-cut pattern remains the same, allowing you to experiment with textures, finishes, and applications. This flexibility makes the clock with 2 pattern for laser cutting a great option for artists, educators, and small businesses alike.
How to Prepare Your Material for Laser Cutting
Before placing the file into the laser machine, make sure your material is properly prepared. If using wood or cardboard, it should be flat and free from warping or debris. Plywood is usually sanded by hand after cutting to ensure a smooth finish. Acrylic sheets might need to be cleaned with alcohol to remove oils or fingerprints that could affect the laser’s performance.
Design Elements and Creative Possibilities
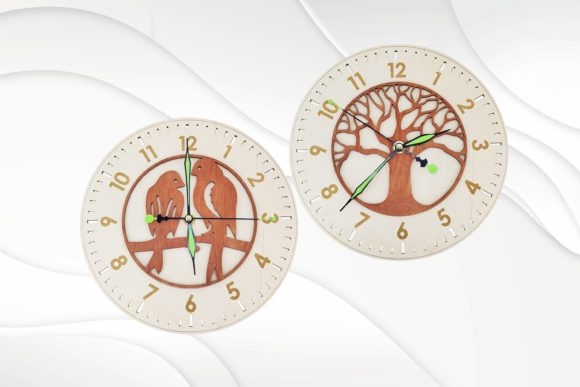
A clock with 2 pattern for laser cutting typically features two interlocking or complementary patterns. One pattern serves as the background, while the second is either engraved or cut out to reveal the numbers or hands. This dual-layer approach allows for a rich visual experience and gives the clock a sense of movement and contrast.
Some examples of how you can enhance your design include:
- Adding engraved SVG elements to highlight specific parts of the clock face.
- Incorporating DXF plan outlines for precision-cut gears or mounting holes.
- Using color gradients or metallic paints to emphasize the layered design.
- Applying varnish or sealant to protect the finished product and give it a professional sheen.
These design elements not only improve aesthetics but also help reinforce the structural integrity of the clock. The dimensions—typically around 253 mm (10 inches) in diameter—make it a compact yet eye-catching addition to any space.
Painting and Finishing Options
Once the pieces are cut, the fun begins! Painting the clock in your favorite colors transforms a simple wooden design into an exclusive and personalized item. Use acrylic paints, spray paints, or even wood stains to bring your vision to life. The ability to customize colors means you can match the clock to a room’s decor, a client’s preferences, or even seasonal themes.
If you want to take it a step further, consider adding:
- Gold leaf accents for a luxurious touch.
- Felt backing for a quieter ticking sound.
- LED lights inside the cut-out areas for a glowing effect.
- Hand-painted dials or Roman numerals instead of printed ones.
These finishing techniques elevate the product beyond just a functional object into a true work of art.
Practical Uses and Business Opportunities
Laser-cut clocks are not just for personal enjoyment—they offer practical value in various settings. In modern life and business, they serve as:
- Home décor items: Unique wall clocks that reflect individual style.
- Gift products: Personalized gifts for birthdays, weddings, or holidays.
- Educational tools: Used in schools or workshops to teach design and craftsmanship.
- Store merchandise: Ready-to-sell items that attract customers looking for handmade or bespoke goods.
For small businesses and Etsy sellers, offering laser-cut clocks can open new revenue streams. Since the product is ready laser file based, you don’t need to invest in heavy machinery. You can collaborate with local workshops or use online laser cutting services to produce the physical items once you’ve designed and painted them.
How to Get Started with Laser Cutting
If you're new to laser cutting, here's a beginner-friendly breakdown of the process:
- Choose a design: Download a ready-made vector template or create your own using design software.
- Select your material: Decide whether you want to use 3mm plywood, cardboard, or another medium.
- Prepare the file: Ensure the file is correctly scaled and formatted for your machine. Check if it contains separate layers for cutting and engraving.
- Set up the laser machine: Adjust the power and speed settings according to the material thickness and type.
- Perform the cut: Watch as the laser precisely follows the vector paths to create your clock design.
- Assemble and finish: Paint, sand, or add hardware as needed to complete the product.
With practice, this process becomes much easier. Many people start with cardboard to test their design before moving on to more expensive materials like wood or acrylic.
Common Misunderstandings About Laser-Cut Clocks
Despite their popularity, there are some misconceptions about laser-cut clocks that can lead to frustration if not clarified:
- Misconception 1: "Laser cutting is too technical for beginners." Reality: While there is a learning curve, using pre-made vector files simplifies the process significantly. Most software and machines come with tutorials to help you get started.
- Misconception 2: "All vector files are the same." Reality: Not all vector drawing cut files are created equal. Some are optimized for engraving, others for cutting, and a few may not be compatible with your machine. Always verify the file format and specifications.
- Misconception 3: "You can't sell laser-cut products." Reality: Unless the design is explicitly marked as non-commercial, you can typically sell your creations. Always read the licensing terms when purchasing a cutting plan for laser machines.
By understanding these nuances, you can avoid unnecessary setbacks and focus on producing beautiful, marketable items.
Where to Find Vector Files for Laser-Cut Clocks
There are numerous platforms where you can find high-quality svg dxf plan files for laser-cut clocks. Look for shops or creators that specialize in original, unique product design. When selecting a package, ensure it includes:
- All six file formats (SVG, PDF, CDR, AI, EPS, DXF).
- Detailed instructions for assembly and recommended settings for the laser machine.
- Clear images of the finished product for reference.
- Dimensions and layer information for accuracy.
Investing in a comprehensive set of vector image files saves time and effort, especially if you're planning to mass-produce or sell your clocks.
Why This Design Stands Out
The clock with 2 pattern for laser cutting is more than just a design—it's a gateway to creativity and customization. Its dual-pattern structure allows for endless variations, from minimalist Scandinavian styles to bold, colorful expressions. Each version you create can tell a story or reflect a theme, making it a truly unique product.
Additionally, because the product is universal and can be made from various materials, you’re not limited by cost or availability. If you can’t source plywood, try cardboard first. Need something more durable? Go for acrylic. This adaptability ensures that anyone can participate in the creation process, regardless of their access to supplies.
Real-World Applications and Inspiration
Many artisans and entrepreneurs have found success with laser-cut clocks. For example:
- A local craft store offers customizable clocks during holiday seasons, letting customers pick their preferred design and color scheme.
- An independent designer sells engraved laser-cut clocks on their website, using SVG and DXF files to produce each one efficiently.
- Schools use laser-cut clocks in art classes to teach students about geometry, symmetry, and digital fabrication.
These real-life examples show how versatile and valuable a vector design for cut can be. Whether you're creating one for yourself or as part of a larger project, the possibilities are nearly limitless.
Final Thoughts
A clock with 2 pattern for laser cutting is a perfect blend of form and function. It combines the precision of laser technology with the charm of handmade craftsmanship, resulting in a product that feels both modern and timeless. By leveraging vector graphics and the right materials, you can turn a simple digital file into a stunning, personalized gift or a profitable item for your store.
Remember, the key to success lies in preparation. Choose the correct file format for your machine, understand the material requirements, and embrace the creative freedom that comes with each design. Whether you're a seasoned crafter or a curious beginner, this project is an excellent way to explore the intersection of art, design, and technology.
So why wait? Dive into the world of laser cutting and start crafting your very own unique timepiece today. With the right tools and inspiration, you'll soon see why this trend continues to captivate makers and buyers alike.